


The idea behind this record is tweak to adjust the label under the computer icon, what you see on the Vista desktop. The result is that the name reflects the true username and computername. For example, guyt (username)-Vista Ultimate (computername). Keep in mind, as opposed to cheap-shot where you just rename the PC, this council dynamically adjusts the name of each user who connects.
The mission is to find a class identifier (CLSID) in HKEY_CLASSES_ROOT, and then change the value of LocalizedString ‘Computer’ to a variable that reflects the user connects to this team.
Launch Regedit
1. Precaution: Rename the existing value:
Locate with regedit HKEY_CLASSES_ROOT\CLSID\
{20D04FE0-3AEA-1069-A2D8-08002B30309D} rename LocalizedString to LocalizedString.Old LocalizedString %username% at %computername%
2. Create a new VALUE. Note type should be Expanded String Value. Name it: LocalizedString
3. Edit the ‘Value data’. I double click LocalizedString, then click in the dialog box and type: %Username% at %Computername%
Incidentally, you could choose more creative words in place of ‘at’. For example, ‘King of’ or ‘Queen of’.
4. To see the fruits of your labours, just press F5 to refresh the desktop, your computer icon should now say the equivalent of: YourName at YourComputer.(See screenshot at the top of this page).
Yahoo messenger (YM) be one of the messenger many worn to communicating online. By using Yahoo messenger (YM) you can communicate with friend, brother or customer.
You only can run once Yahoo messenger (YM) at the time of concurrent. With tips you can run Yahoo messenger (YM) several times so that at the time of same you can logging by using several yahoo account .
1. Run registry editor by click button start - run. type regedit then press enter.
2. Find key hkey_current_user\software\yahoo\pager\test.
3. In right side, click right and choose menu new - dword value.
4. Type plural.
5. Double click in plural and contents with value 1 (one).
6. Out from registry editor.
If you follow step above correct so you can run Yahoo messenger (YM) several times.
To know the guitar, you must first learn what the different parts of the
guitar are. The pictures below will show you what each part of the guitar
is called.

Before you begin playing, you must also know how the frets and strings
are numbered (See Figure Below). The strings are numbered from the lightest
(thinnest) to the heaviest (thickest). So the thinnest string is the first
string, and the thickest is the 6th string. A guitar in standard tuning
is tuned to E-A-D-G-B-E. This shows the 6th string to the 1st string. In
other words. 6th string - Low E, 5th string -A , 4th -D, 3rd -G, 2nd -B,
1st -High E. Look at the diagram to find out how the frets are numbered.
Note: The 0 fret is also the open note on each string.
 |  |
 In this tutorial I'll explain the techniques I used to make a beautiful flower from a cucumber.
Dynamic Wallpaper: Part 1: Sunrise, Sunset
With the onset of new SE phones being able to support standby swfs, we see a growing number of standby swfs that are animated in such a way that they change according to the time of day. Wouldn't it be nice to see an evening landscape when it's dark out and a bright meadow during the afternoon? Let's see how this is done!
Above is an swf example of the 'animation' we are aiming for. Obviously, the background should only change as time progresses, but I just wanted to give you an idea of what the end product would be like in summation.
The trickiest part of this project is creating the effects that corresponding to sunrise and sunset; the actionscript is incredibly simple and you have probably seen it already. In this tutorial we are aiming for mountain scape, where the dynamic components are the sun, moon and sky colour.
Therefore, we first need to create 3 graphic symbols that correspond to the sun moon and sky. Since we will need to change the colour of these symbols using the Color properties, we will create these symbols with a white fill. When creating your graphics, try to center them onto the crosshair using the Align tool. That way, it will be easier to select the appropriate colour tween. The sky will just be a white rectangle, the sun a circle, and the moon a will be a yellow crescent. Because I felt the moon is generally a static colour, I decided to keep it one colour. The others may change colours, so I felt it would be easier to keep them white and apply a tint later:
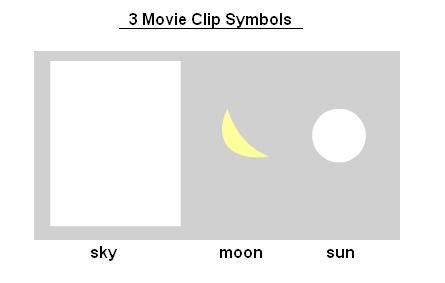
Next, we create a new movieclip that will house the entire 24 hour animation. The easiest way to create this animation is to have the frame length set at 24 frames, but I feel that it would be pretty choppy, so in this tutorial, we are creating a 48 frame animation. The frame numbers will correspond to:
Frame 1 (Midnight)
Frame 20 (10:00 am)
Frame 30 (3 pm)
Frame 48 (11:59pm)
We will need 4 layers:
TOP
1) Foreground (we will use a mountain scape)
Motion Guide (todirect the motion tween of sun and moon)
2) Sun (will contain the sun animation)
3) Moon (will contain the moon animiation)
4) Background (this will contain the sky)
BOTTOM
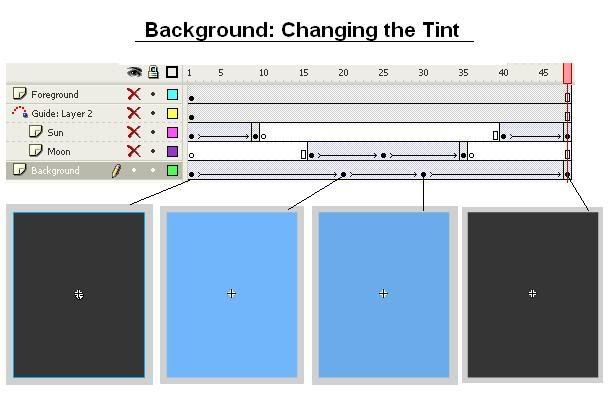
Here is the overview of the movieclip timeline. You can refer to this later:
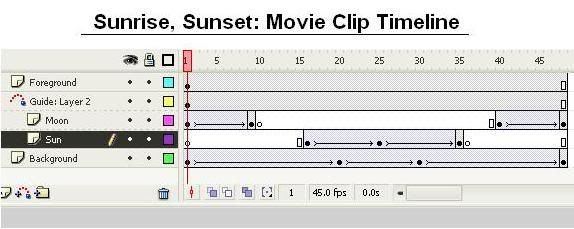
We will go through each layer individually.
Foreground:
This will be the top most layer and will be the graphic you would like to display in the forefront of the landscape. This can be anything to your liking such as trees, houses, buildings. For this example, we use a mountain range. Be sure not to cover up the whole stage, or else you will not be able to see the background sky change colours. Don't mind the other layers on the picture below:
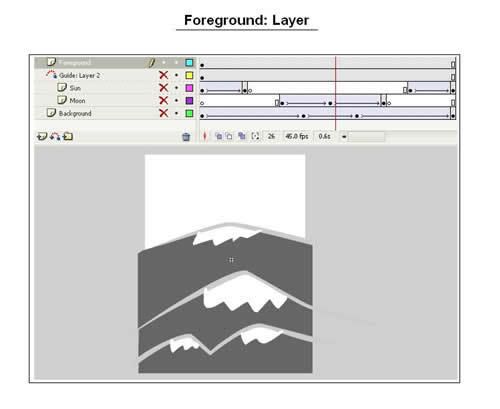
Background:
The background will contain the sky graphic symbol undergoing a motion tween (colour change).
First off, we need to determine the appropriate colours of the sky at various times of day while keeping in mind that there are 48 frames to represent 24 hours in the day. Here is what I chose. This is a very plain and vague colour scheme which can be definitely improved upon.
Frame 1 (Midnight): #000000 (will look like #353535)
Frame 20 (10:00 am): #4CA3FA (will look like #71B6FB)
Frame 30 (3 pm): #4CA3FA (will look like #71B6FB)
Frame 48 (11:00pm): #000000 (will look like #353535)
*IMPORTANT: Remember that our original sky symbol was white! This means that the symbol will appear a few shades lighter when you add the tint. The tint colour will not be equivalent to what is shown in the symbol!
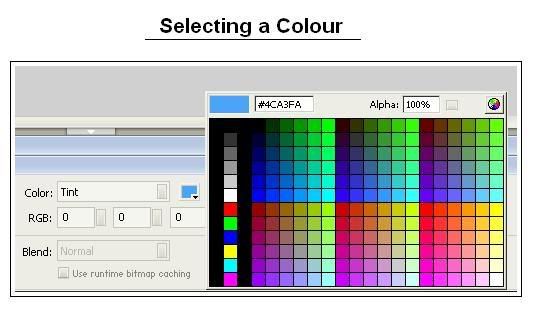
To apply these colour changes, first create keyframes on frames 1,20, 30 and 48, and apply a motion tween between them. Then select the keyframe and symbol, then select Color: Tint at the bottom properties menu. I chose Tint over Advanced because I can use the dropper tool to select the appropriate colour instead of guessing the RGB values.
Sun and Moon Layers:
These layers will use the same concepts as the sky colour change tweens except we add one more dimension: a motion tween guide. A motion tween guide lets the user designate a path for the symbol to travel while it is undergoing a motion tween. This is appropriate for the sun and moon animations because sunrise and sunsets have a curved path, not straight!
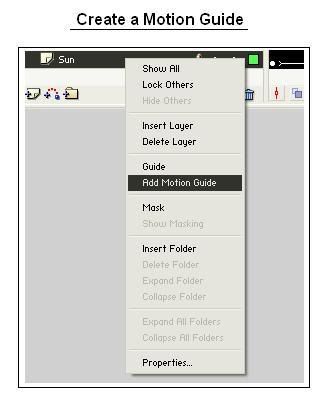
First create the two layers that house the Sun and Moon symbols. Next, right click the sun layer and select Add Motion Guide... This will create a new pseudo layer which will be the parent for the Sun. Next, move the Moon layer upwards so that it becomes under the Motion Guide as well. We put them in the same guide because for simplicity, they will rise and fall in the same path. (Look at the MovieClip Timeline picture)
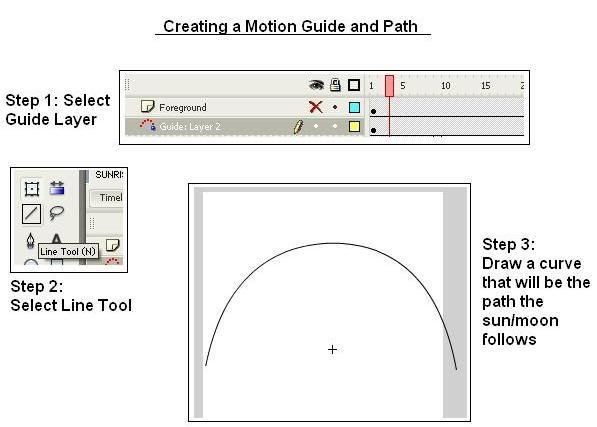
After this is complete we have to start creating the path for the moon and sun to travel on. Selecting the Motion Guide layer, choose the line tool and roughly draw out a curve for which you want the sun/moon to follow. Now, remember that during the day, the moon doesn't need to be on stage, and during the night, the sun doesn't need to be on stage.
Frame 1 (Midnight)
Frame 20 (10:00 am)
Frame 30 (3 pm)
Frame 48 (11:59pm)
I decided the sun should rise at around 7/8ish am; this corresponds to around Frame 16. So, select the sun layer: Frame 16 and place the sun on the stage such that the crosshair is centered on one part of the curve you drew in the motion guide. Now, create a keyframe at frame 25; this corresponds to around 12 noon, so now, move the sun so that the cross hair is at the top of the curve. Now, create a keyframe at frame 35, and move the sun so that its the right most side of the curve.
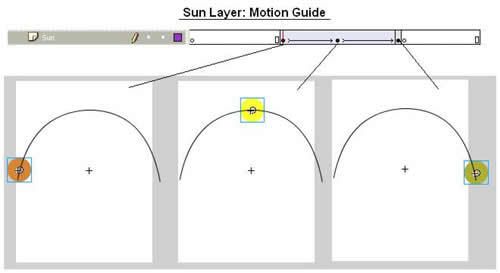
Now, you can select each keyframe (16, 25, 35) and change the colour properties of the sun: it is more orange during sunrise and sunset and more yellow during high noon. Fiddle around with the tint tool to get the best colour. You can see what I did in the above diagram.
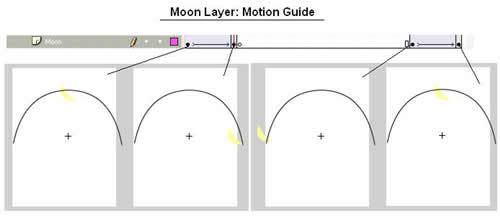
Now, we can repeat the same steps for the moon layer. But remember that because the moon rises at night, the motion tween will begin at the ENDS of the timeline. Make sure that the moon is placed in the exact same place at Frame 1 and 48, so it can be continuous.
The Main Timeline:
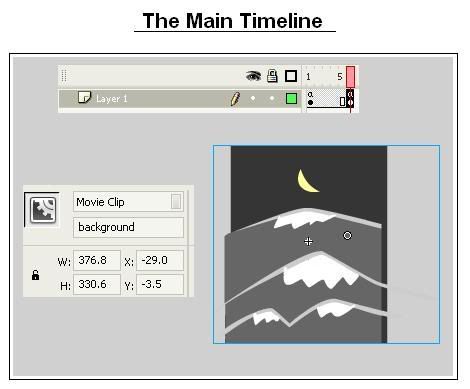
Now, place your created movie clip in the main timeline on frame 1. Select your movieclip, and give it the variable name: background. Create a keyframe at frame 6.
Right click Frame 1, add the following actionscript:
//this will get the current time and convert it to a number between 1 and 48.
/:theHour=FSCommand2("GetTimeHours") * 2;
/:theMinutes=FSCommand2("GetTimeMinutes");
/:hourFraction = Math.round((/:theMinutes/60) * 2);
tellTarget("background"){
gotoAndStop(/:theHour+/:hourFraction+1);
}
Right click Frame 6, add the following actionscript:
gotoAndPlay(1);
There you have it! Now compile and test it out! The movie will check the time every 6 frames and update the movieclip to reflect this. So in a sense, it seems continuous on the viewer's perspective. You can test this easily by previewing on computer, and changing your system's clock, and see the flash file update the background automatically!
EXTRA TIP: If you want the animation to seem more realistic, you can use motion tween easing for the movement of the sun and moon, so that it slows the most when it reaches the peak of the curve.

Preloaders, the hardest of the simplest tasks in Flash. Simply put, preloaders are custom-built indicators that inform the viewer that content is being loaded into the Flash player. As easy as they sound implement, creating one that works effectively and correctly can often be a quite frustrating task. This tutorial should help explain the ins and outs of preloaders and help you be better equipped to deal with them on your own.
Basic Kinds of Preloaders
There are generally two kinds of preloaders:
1. Preloaders that load the main, current Flash movie and
2. Preloaders that load additional, external content within an already loaded main movie
When loading the main movie, you are using a preloader that exists within the same movie that you are attempting to load. Because of this, these kinds of preloaders should be (in terms of file size) as small as possible since the preloader itself has to load prior to the rest of the movie before it can even start to function.
When loading external content, such as other Flash movies (swf files) or images, preloader size isn't as important. This is because the preloader for that external content does not exist within the content. Instead, it exists within the current Flash movie which should already be completely loaded, preloader and all.
The complexity of a preloader can range anywhere from a simple, static waiting message to a dynamically updated animation that reflects the status of the content loaded. The difficulty of implementing a preloader obviously increases with complexity. Preloader progress bars are the most common form of preloaders which show a progression bar that displays how much content has been loaded visually.
More info >>
There is 6 simple steps to create people face object, here is it.
Step 1, Make the oval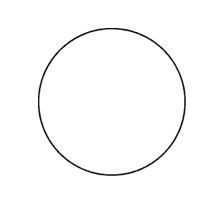
Draw a circle. The circle is the foundation of the head for any veiwpoint. It doesn't need to be a perfect circle like this. A basic ovoid shape will do nicely.
Step 2 Make the chin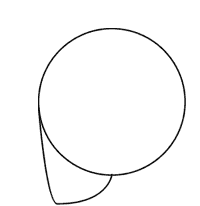
Add the chin. The chin will come down from the center point of the outside edge of the circle to about half that length below the bottom edge of the circle. The Jawline should come back towards the center of the bottom edge of the circle as shown here.
Step 3 Make Facial Divisions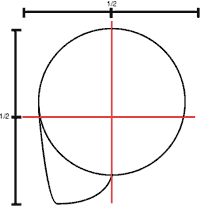
Split the face shape in half vertically and horizontally. These axis lines are the ear line (vertical) and the eyeline (horizontal).
Step 4 Make More Divisions
Divide the space between the eyeline and the chin in half. This is the "Bottom of the Ear and Nose" line. Divide the space below the noseline into 3rds. the upper 3rd is the Mouth line.
Notice the ear sits in the verticle axis toward the back of the head and rest between the nose line and the brow line.
Step 5 Make the eye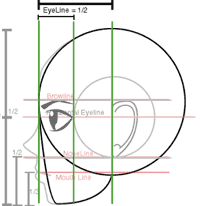
Divide the space between the front of the head and the vertical earline axis. This is where we place the eye on the eyeline. The outside corner of the eye should hit this new division line and the inside corner should be just inside of the outer edge of the mouth.
Step 6 Make Hair Line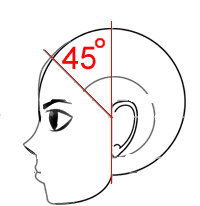
The Hairline is located by drawing a 45 degree angle from the intersection of the horizontal eye line and the vertical ear line.
source
Using keyframe animation, it is too easy to create dull, robotic animation. Linear paths make for lifeless animation. This tutorial will demonstrate a few ways to apply some of the Principles of Animation, into your Flash projects.
Anticipation and Follow Through
Naturally, before an object with awareness moves forward, it anticipates the motion, by moving backwards slightly, first. After finishing the forward action, it doesn't completely come to a stop all of the sudden- it pulls back a little bit. This should be especially apparent if the action doesn't ease out.
Raise you hand to eye level and hold it still. Now deeply relax the bones in your hands, and then casually move it about one foot to the side. Watch closely the anticipation and follow through motions which naturally occur.
To create a gross cartoony effect, every sweeping motion without obvious easing should have a contrasting action at it's beginning and end.
If you play Ball #1 you can see that it is on a linear path. It just goes straight to the end point, at the same speed all the way there.
Although the motions are subtle, Ball #2 pulls back momentarily, before easing ahead. At the end, it bounces a bit. This creates a more natural, and interesting animation.
To apply these effects in Flash, first animate the main path you want an object to follow, and enable Motion Tweening.
Next, add new keyframes (F6) a few frames after the begginning frame, and a few frames before the last frame.
On the second keyframe (frame 3), move the object behind it's original position. On the third keyframe (frame 18), position the object farther than the end destination.
source

Look at you! You just finished your first wonderful and beautiful Flash animation. You put all your love, blood, and guts into it, and it shows. The stylish design is top notch, the dialogue between the characters is witty, and your amateur voice actors (bribed into service with promises of back rubs and marzipan) sound surprisingly well studied.
You're poised to submit this award-tempting piece to Animation Express, however, when you notice that something looks wrong. The star of the animation, the "Walking Across the Living Room" guy, is supposed to look hilarious. And he does ... but for all the wrong reasons. You spent so much time working through the little details — the big stomach flapping around, the little hand scratching that huge butt. But it still doesn't feel quite right, somehow. He doesn't really walk. Rather, he slides, hops, and jerks all over the carpet. Drat! Curses! And so on! Well, the important thing to remember is: Don't panic.
Making a character's walk look realistic is a long-lost, and long-cherished, secret of animation. There's no magic button to push, sadly, but the steps can be broken down into easily digestible bites that are easy to understand and recreate. And that's just what this tutorial is going to show you how to do.
In the pages that follow, I will show you how to build a simple walk cycle using an example character that I've kept fairly basic — with no detail or extreme style to distract you, applying the principles you learn here to your own designs later will be effortless. Once you've mastered this basic walk, then you can give your character some added personality with exaggerated positions, or different speeds, or crazy walks.
I've provided in-depth instructions as well as screen shots to illustrate the progression of steps. For those of you who wish to follow along — and I recommend that you do — you can start by downloading the FLA source file. (NOTE: To download the file on a PC, right-click and choose "Save As ..." and on a Macintosh, hold down the mouse button and choose to save the file on a local drive.)
Now let's get moving.

Use your browser to access the file with your web server's URL, ending with the "/hello.php" file reference. When developing locally this URL will be something like http://localhost/hello.php or http://127.0.0.1/hello.php but this depends on the web server's configuration. If everything is configured correctly, this file will be parsed by PHP and the following output will be sent to your browser:
This program is extremely simple and you really did not need to use PHP to create a page like this. All it does is display: Hello World using the PHP echo() statement. Note that the file does not need to be executable or special in any way. The server finds out that this file needs to be interpreted by PHP because you used the ".php" extension, which the server is configured to pass on to PHP. Think of this as a normal HTML file which happens to have a set of special tags available to you that do a lot of interesting things.
If you tried this example and it did not output anything, it prompted for download, or you see the whole file as text, chances are that the server you are on does not have PHP enabled, or is not configured properly. Ask your administrator to enable it for you using the Installation chapter of the manual. If you are developing locally, also read the installation chapter to make sure everything is configured properly. Make sure that you access the file via http with the server providing you the output. If you just call up the file from your file system, then it will not be parsed by PHP. If the problems persist anyway, do not hesitate to use one of the many » PHP support options.
The point of the example is to show the special PHP tag format. In this example we used . You may jump in and out of PHP mode in an HTML file like this anywhere you want. For more details, read the manual section on the basic PHP syntax.
Source
This tutorial will teach you how to create a simple Ripple effect in Flash MX 2004. The .fla file also included at the end of the tutorial.
Please note:
1. You need to have Flash Player 7.0 installed to view the Flash animation.
2. Flash MX 2004 or higher must be installed in your system to download the .fla file.
STEPS TO FOLLOW
Create a Graphic Symbol.
* Import an image to your work area upon which you would like to create ripple effect.
* Press F8, to convert this image to a symbol.
* Name this Symbol "girl_gr" and choose graphic behavior. Press OK.
* Name this Layer "bg".
* Select girl_gr and choose Alpha 99% from color list box in your property window.
Create a Movie clip.
* Press Ctrl+F8, to create Ripple movie clip.
* Name this symbol "ripple_mc" and choose Movie clip behavior. Press OK.
* Drag girl_gr to your working area from Library (ctrl+L).
* Select girl_gr and choose Alpha 0% from color list box in your property window.
* Insert Keyframe (F6) into the 5th frame.
* Remaining on the 5th frame, Select girl_gr and choose Alpha 99% from color list box in your property window.
* Now select 1st frame, choose Motion Tween from Tween list box in your property window.
* Insert Keyframe into 15th frame and later to 20th frame.
* Remaining on the 20th frame, Select girl_gr and choose Alpha 0% from color list box in your property window.
* Select 15th frame, choose Motion Tween from Tween list box in your property window.
* Insert a new layer above this layer, call it "Layer 2".
* Select frame 1 of Layer 2 and draw a borderless square or rectangle depending on the type of ripple effect you want.
In the above demonstration, I have used rectangle with 15 pix as its height.
* Place this vector wherever you want the ripple to begin. Make sure that the vector belongs only to layer 2.
* Insert Keyframe into the 20th frame of Layer 2.
* Place the vector wherever you want the ripple to end or ebb.
In the above demonstration, I have placed it right at the bottom and reduced the height to 5 pix.
* Select 1st frame, choose Shape Tween from Tween list box in your property window.
* Right click on Layer 2 and select Mask.
* Save (ctrl+S). Make it a habit to save your work after each step you do.
Insert Ripple Movie Clip onto Scene 1
1. Now go back to Scene 1.
2. Insert a new layer above bg layer and call it ripple1.
3. Insert new Keyframe (F6) into the 10th frame of ripple1 layer.
4. With 10th frame of ripple1 layer selected, Drag ripple_mc movie clip onto the working area. Place it appropriate to girl_gr. Make sure that this movie clip is placed exactly where you had placed your square or rectangular vector in ripple_mc Movie clip.
5. Insert frame (F5) into the 30th frame of ripple1 layer. This is just to make sure that the ripple _mc runs only for 20 frame.
6. Insert another new layer above ripple1 layer and call it ripple2
7. Insert Keyframe into the 20th frame of ripple2 layer.
8. With 20th frame of ripple2 layer selected, Drag ripple_mc movie clip onto the working area. Place it appropriate to girl_gr just the way you did in step 4.
9. Insert frame (F5) into the 40th frame of ripple1 layer. This is just to make sure that the ripple _mc runs only for 20 frame.
10. Insert frame (F5) into the 40th frame of bg layer.
Here you go!! Your movie is ready. Press Ctrl+Enter to view your movie. Wasn't it simple. download fla
Source
Did this ever happen to you? You turn on your computer and Windows stays at the splash screen and does not boot up. What could be the cause? There are quite a few issues that would not allow Windows to boot. In this article we will examine those issues and give you tips on how to determine what is wrong.
The first thing you need to consider is when was the last time your computer booted into windows normally? What were you doing? Did you download anything? These are all factors to determine when the problem occurred and why. Sometimes things just happen and hardware can malfunction from one minute to the next. Since we are dealing with electronic components they don't need an excuse to stop working.
The first step to take when determining what is wrong is to try and boot into safe mode. If your computer will boot into safe mode than most likely you have a hardware conflict or bad board. If you installed an add on board or changed any hardware recently this would be a good place to start.
Before you start removing boards you should go into device manager while in safe mode. Click start/control panel/system/hardware/device manager if your running XP. Check to see you have any conflicts or splats. If you do remove them and try to boot into normal mode. Many times this will fix the problem. If it boots normally than the problem is solved. If you see nothing abnormal in device manager than you can try reverting back to a restore point that you know your computer was working normally. Sometimes doing a restore will solve many problems that have occurred.
If you still cannot boot into normal mode than you will need to remove boards one at a time and booting after each time. If at any time you boot normally than you have found your culprit. Don't rule out mice and keyboards they can also cause computers not to boot properly. The best way to rule them out is to unplug them and than try to boot.
What if your computer will not boot in normal mode or safe mode but just stays at the splash screen. This is normally not a hardware problem but Windows system files somehow has been corrupted. You could have downloaded something that had a virus in it. Windows will not boot if its main files where damaged or corrupted. Under this type of conditions you will have to reload your computer. You try a repair before actually wiping out your drive. If you are able to do this with no errors and the system runs fine than you good to go. Many times however Windows needs a fresh install.
A friend recently had this happen to her when she downloaded something from a website. She picked up a Trojan which damaged her system files and her computer had to be reloaded the repair would not fix it. This can happen to anyone when they are not careful online. Its always best to backup important data in case this ever happens to you.
These tips should help you if you ever have a problem where your system will not boot into Windows normally.
Molto spesso ho l’esigenza di modificare un sito da una postazione differente da quella solita dalla quale sviluppo. Ovviamente non posso scaricare i file sul computer dove mi trovo; questo perché sarebbero in ogni caso inutilizzabili visto che, molto probabilmente, non avrei a disposizioni server web e database con i quali, quasi sempre, i miei siti hanno necessità di interagire.

More : http://www.darcas.net/lab/2007/02/03/lavorare-in-rete-con-dreamweaver/
In preparation, this photo has already been cropped (to a 6x6 inch square format, at 300 dpi) and converted to black and white. It's important, I think, to begin with a good b&w. There are a lot of ways to convert a color image to black and white but I get the best results with a technique created by Greg Gorman (PDF, html).
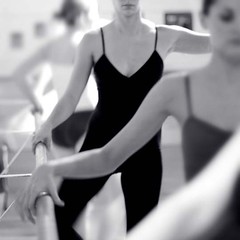
The image you choose for this tutorial should not be mostly black as the texture (as described in this tutorial) doesn't show up on black. Other than that, there are no requirements. There is, however, a suggestion: save your image in a format that will preserve its quality. As a rule, you should never save working files in JPEG format. Every time you save your image as a JPEG it loses image quality. You can save your working file(s) in Photoshop (psd) format but I prefer to save them as TIFF files with no compression.
Note: This is part of a Photoshop tutorial intended to be viewed as a set.
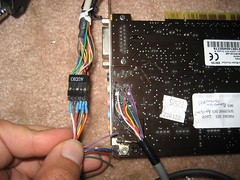
Connecting AC97 Front Panel Audio Header to Sound Blaster Live! 5.1
Originally uploaded by DandyDanny
into the mix. This is also a basic introduction to Microsoft Front Page....html htm tutorial basic beginning web page webpage code coding programming embed tags
More Microsoft Frontpage Tutorial
You don't know how to use powerpoint? don' worry, the video tutorials below may help you to do your job. enjoy and download it.
Adding a Soundtrack in PowerPoint 2007
PowerPoint 2007 Overview
Check this to enhanced your experience.
Adding Custom Animation in PowerPoint 2007
create template in Powerpoint
What the table means for you? This video tutorial may help you to make table with Microsoft Word. Require Flash Player.