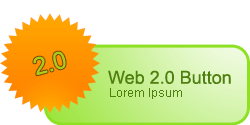

Part 1 - Creating the Base
1. Create a new document in Photoshop, 250×150 in size with a white foreground.
2. Create a new layer. Add a rounded rectangle via the Rounded Rectangle Tool (U) onto the document with these shape settings. After the shape is placed on the document, take out your Move Tool (V) and align it to the bottom-left corner of the document.
3. Black is definitely not a good color for a Web2.0 button, so we’re going to add a color overlay and stroke to the button. You’ll notice why the stroke is the same color in the next couple of steps.
4. Take out your Move Tool (V). Hit the up and left arrow on your keyboard 3 times each. This will allow the bottom-right side of the border to be visible in the document.
5. Take out your Move Tool (V). Hit the up and left arrow on your keyboard 3 times each. This will allow the bottom-right side of the border to be visible in the document.
6. CTRL + Left Mouse click the button layer icon to make a selection out of the button.Take out your Gradient Tool (G). On a new layer, click and drag your mouse from the top-right section of the document all the way to the bottom-left side of it. If you’re having trouble with the gradient, follow this gradient guide. You should now have a nice glossy button base!
Part 2 - Adding the Badge
1. Change your foreground color to #FF7E00 (bright orange color.) Next, take out the Custom Shape Tool (U). Select this badge shape, and then apply these settings in the properties toolbar. Once all the settings are in place, all you have to do is click and drag the badge to the top-left section of the document.
2. Create a new layer. CTRL + Left Mouse click the badge layer to make a selection of it, just like we did to the button in Step 5. Take out your Gradient Tool (G) once more. This time instead of a linear white to transparent gradient, select a radial white to transparent gradient. Now click and drag your mouse from the center of the the badge to below the badge.
3. Change the layer’s blending mode from Normal to Soft Light.
4. Create another new layer. On this one, we’ll be dragging the radial gradient from the top side of the badge to the center of the badge.
5. Change your foreground color to a green color (I used #8EE122.) Next, take out the Horizontal Type Tool (T) and type out something to go with your badge. I simply put “2.0″ in my text layer. Use the font Arial, with a 24pt size and Strong anti-aliasing. Change the opacity of the text layer to 75%.
Source : http://upupmedia.com/?page_id=44


